How to Sew a Coat: The Plaid Coat, Step by Step
A long straight coat with a shirt collar, front pockets and a four-button closure, to sew in sizes 34 to 56 with our free assembly guide.
By Marie · Updated
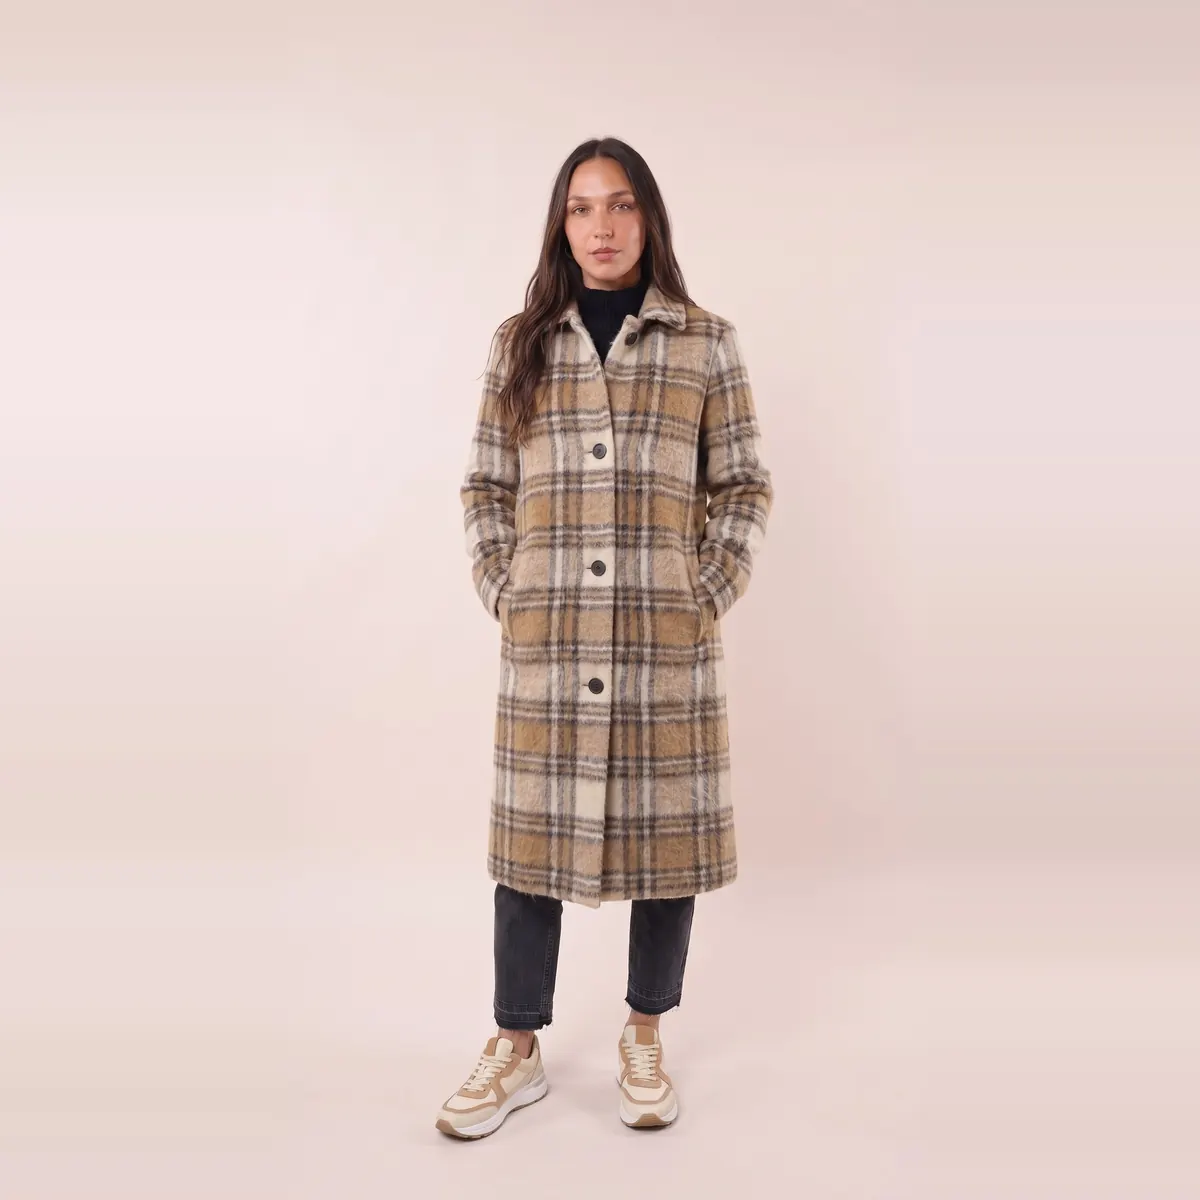
This free tutorial shows you how to sew a coat: the plaid coat, a straight-cut coat with a shirt collar on a collar stand, front pockets and a four-button closure, in sizes 34 to 56. The coat is unlined: only the pockets are cut from lining, and the facing edge is finished with bias binding. Below you'll find the full assembly guide, with the lengths, fabric amounts, pattern pieces and cutting layouts, then the 10 steps with their diagrams.
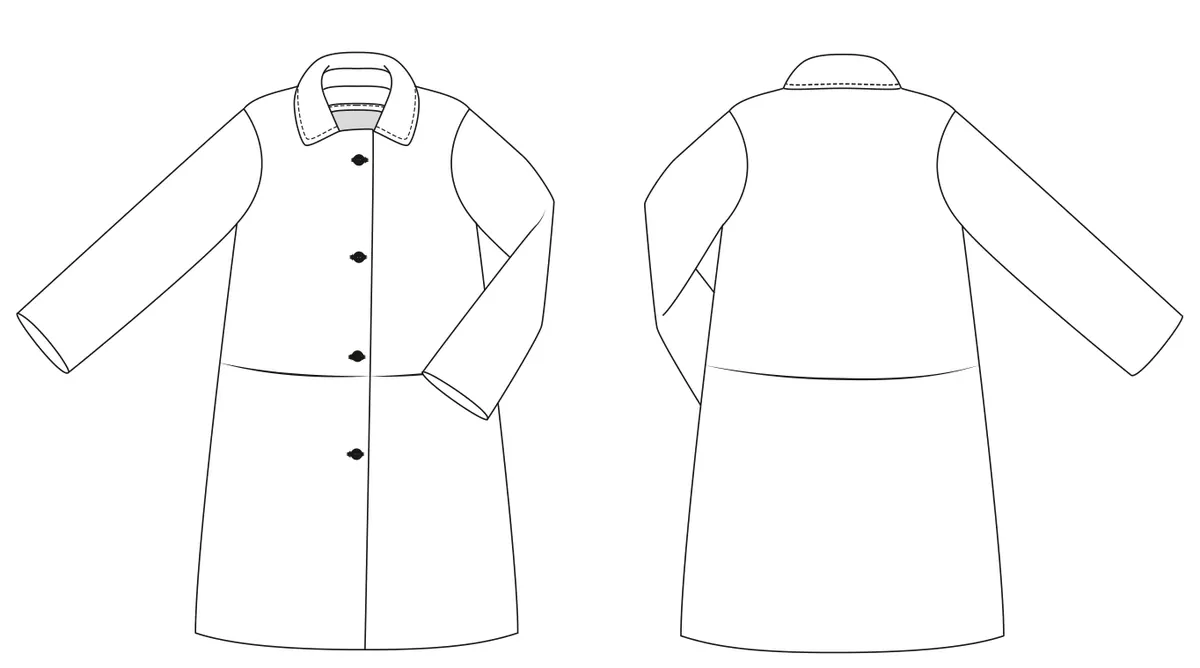
The plaid coat: a straight coat with a shirt collar and front pockets
This free tutorial walks you through the whole plaid coat, from the pattern pieces to the last press. For more garments explained the same way, browse our free sewing tutorials.
It's the ideal coat for spring and fall: a straight cut, front pockets and a pretty collar. A timeless piece, chic and easy to wear.
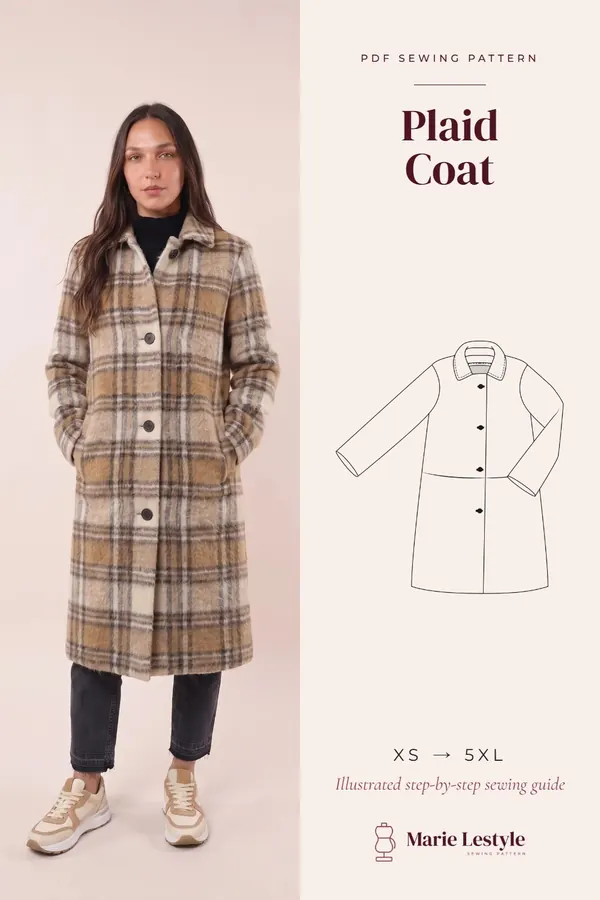
The front and back are each cut in two parts, upper and lower, joined by a horizontal seam. The pockets are caught in this front seam. The shirt collar sits on a collar stand. The coat is unlined: only the pockets are cut from lining, and the edge of the facings is finished with bias binding.
Sizes 34 to 56.
The finished plaid coat
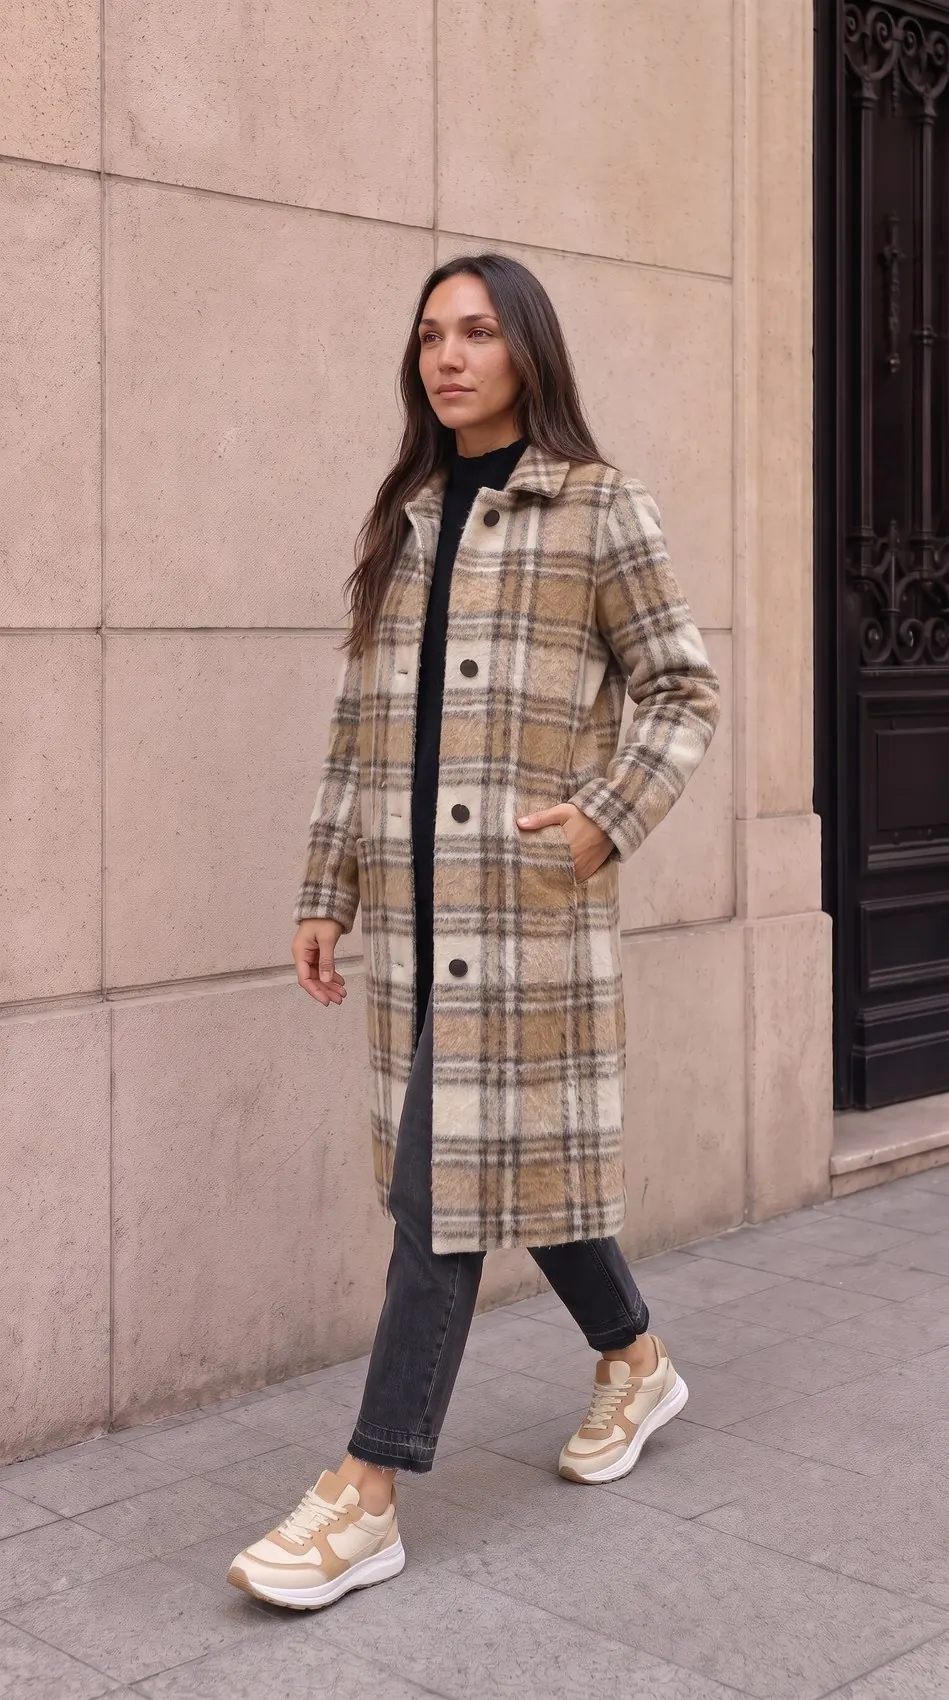
These photos of the finished coat show the result to aim for from every angle.
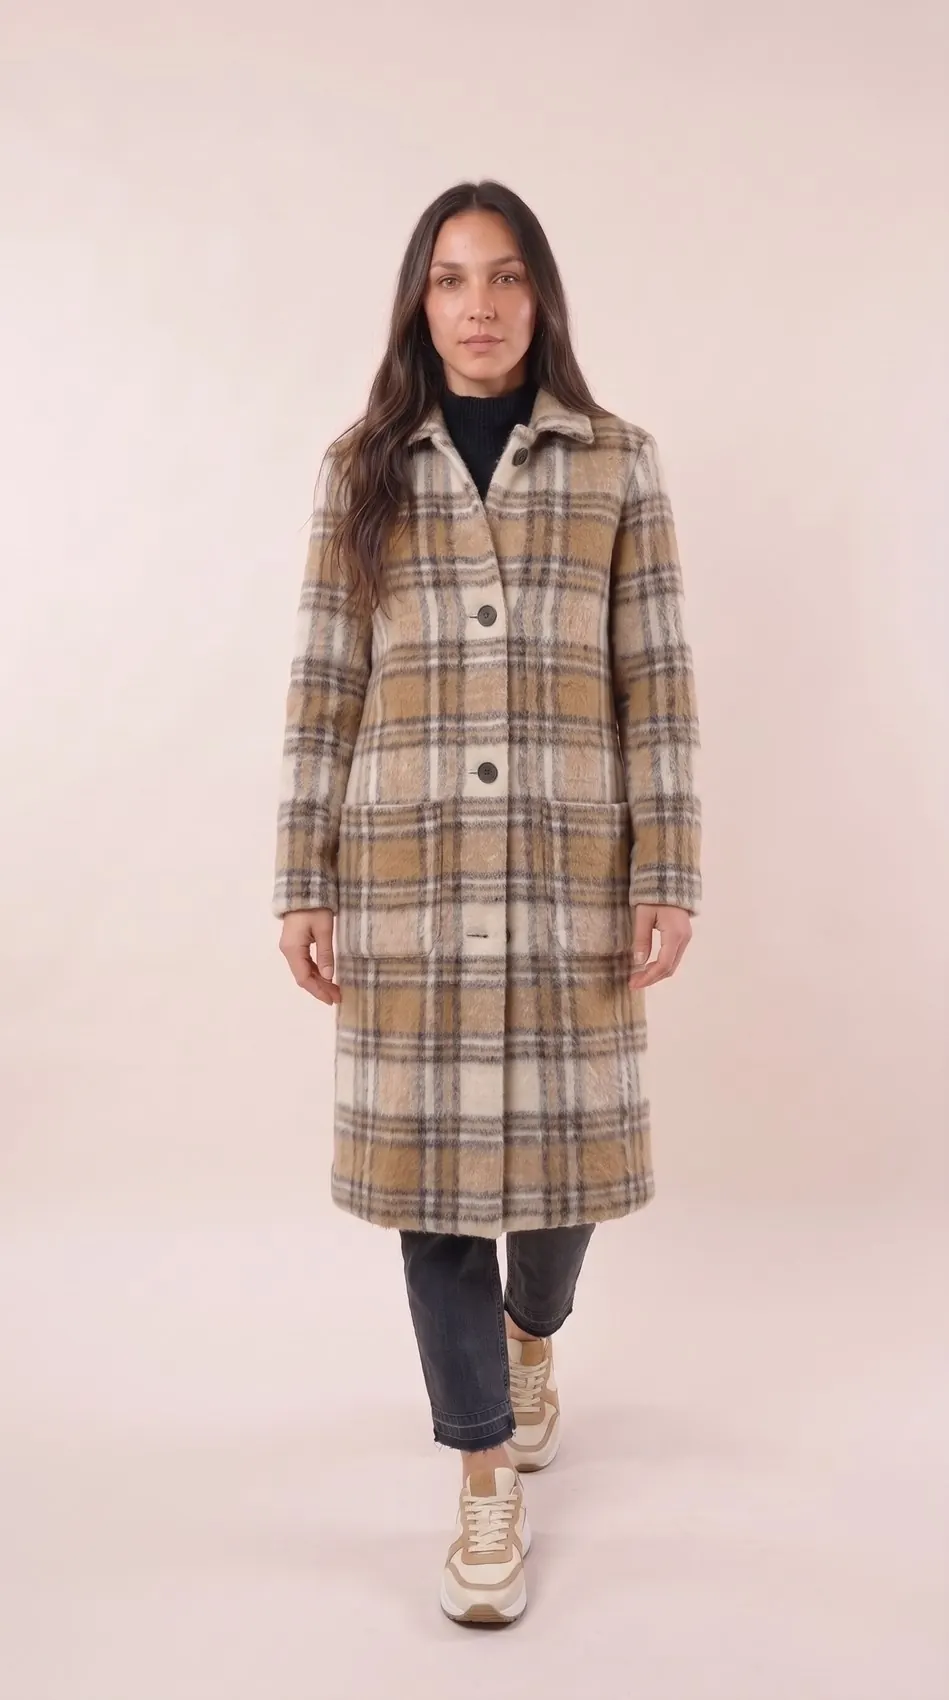
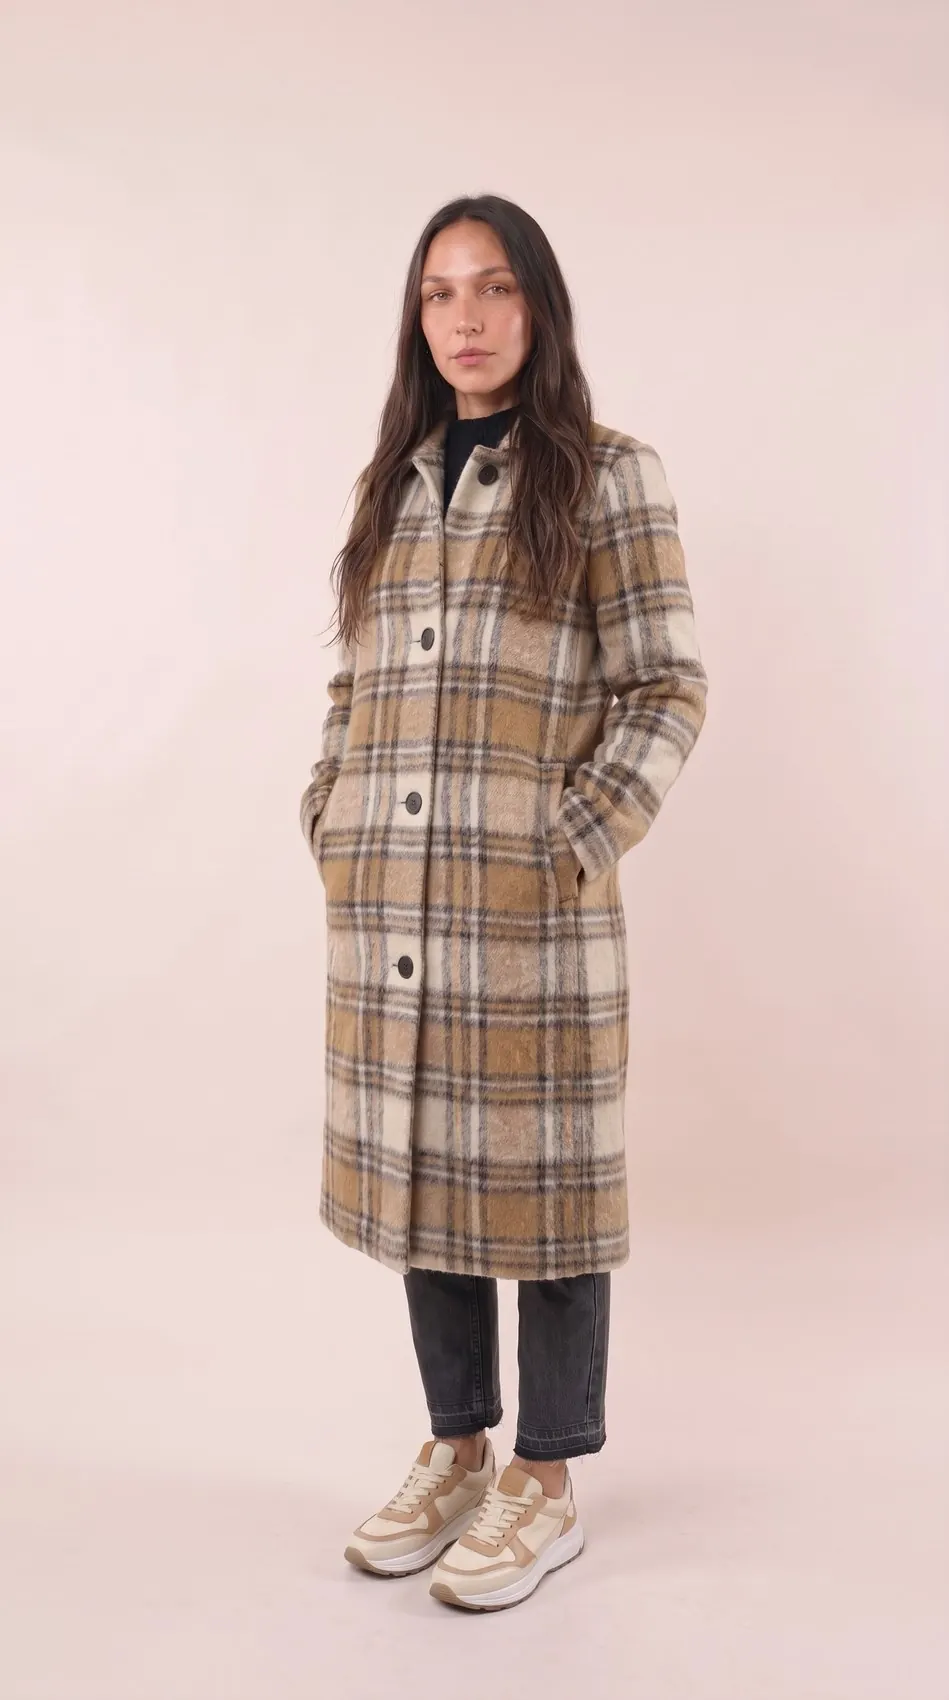
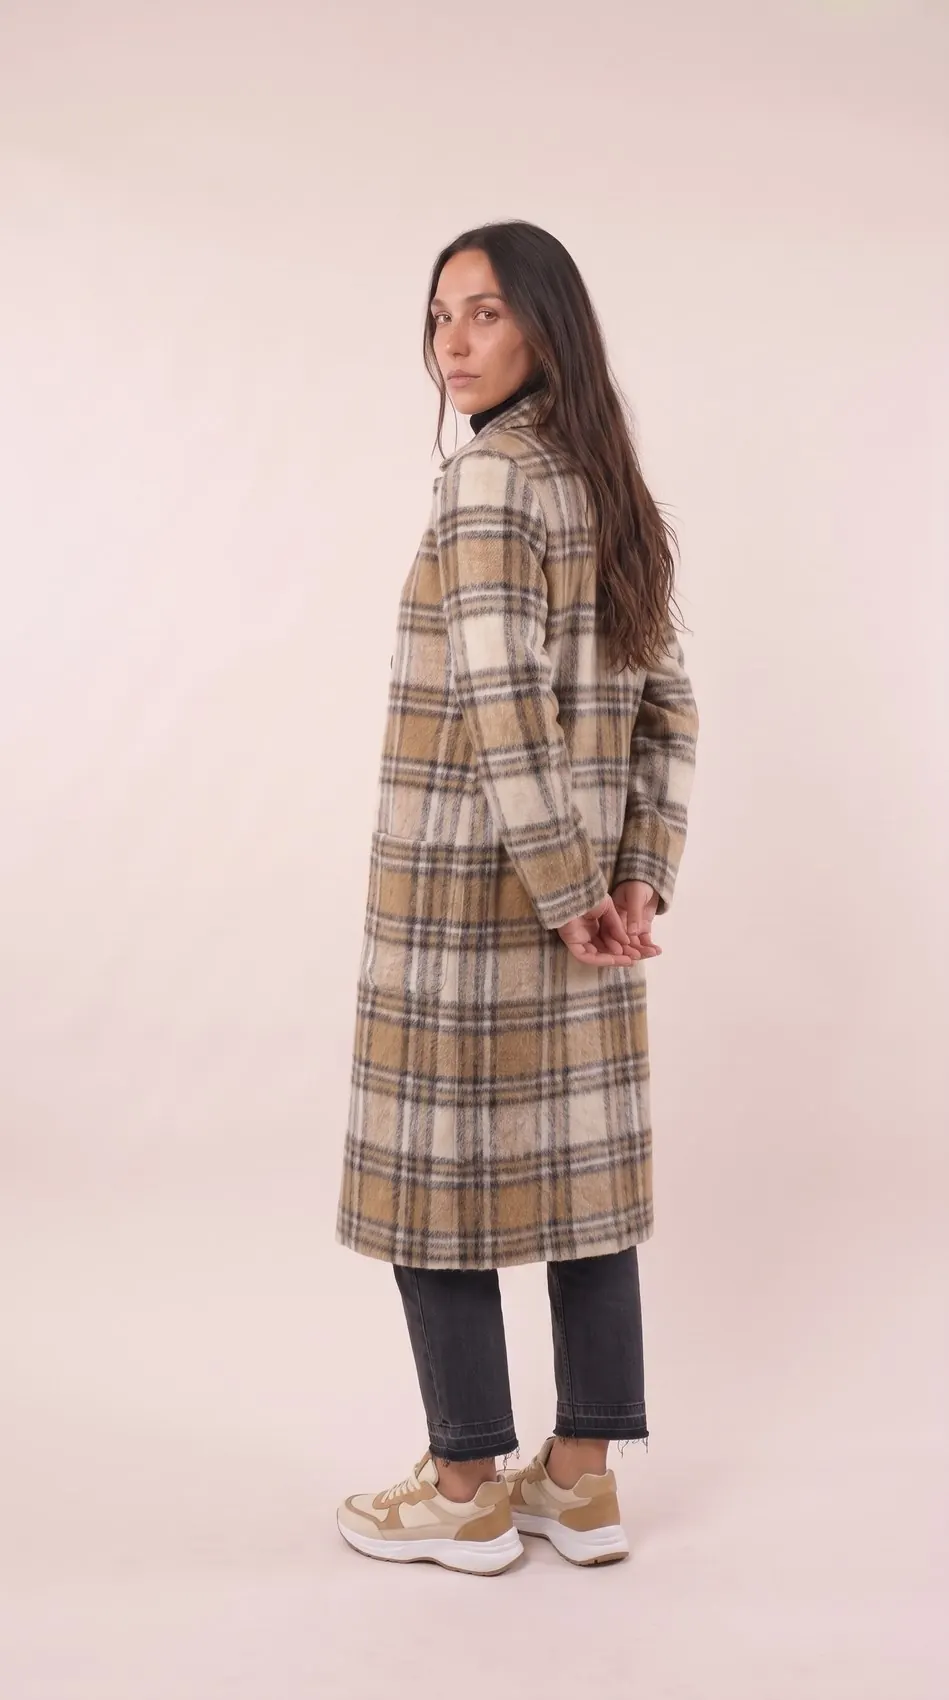
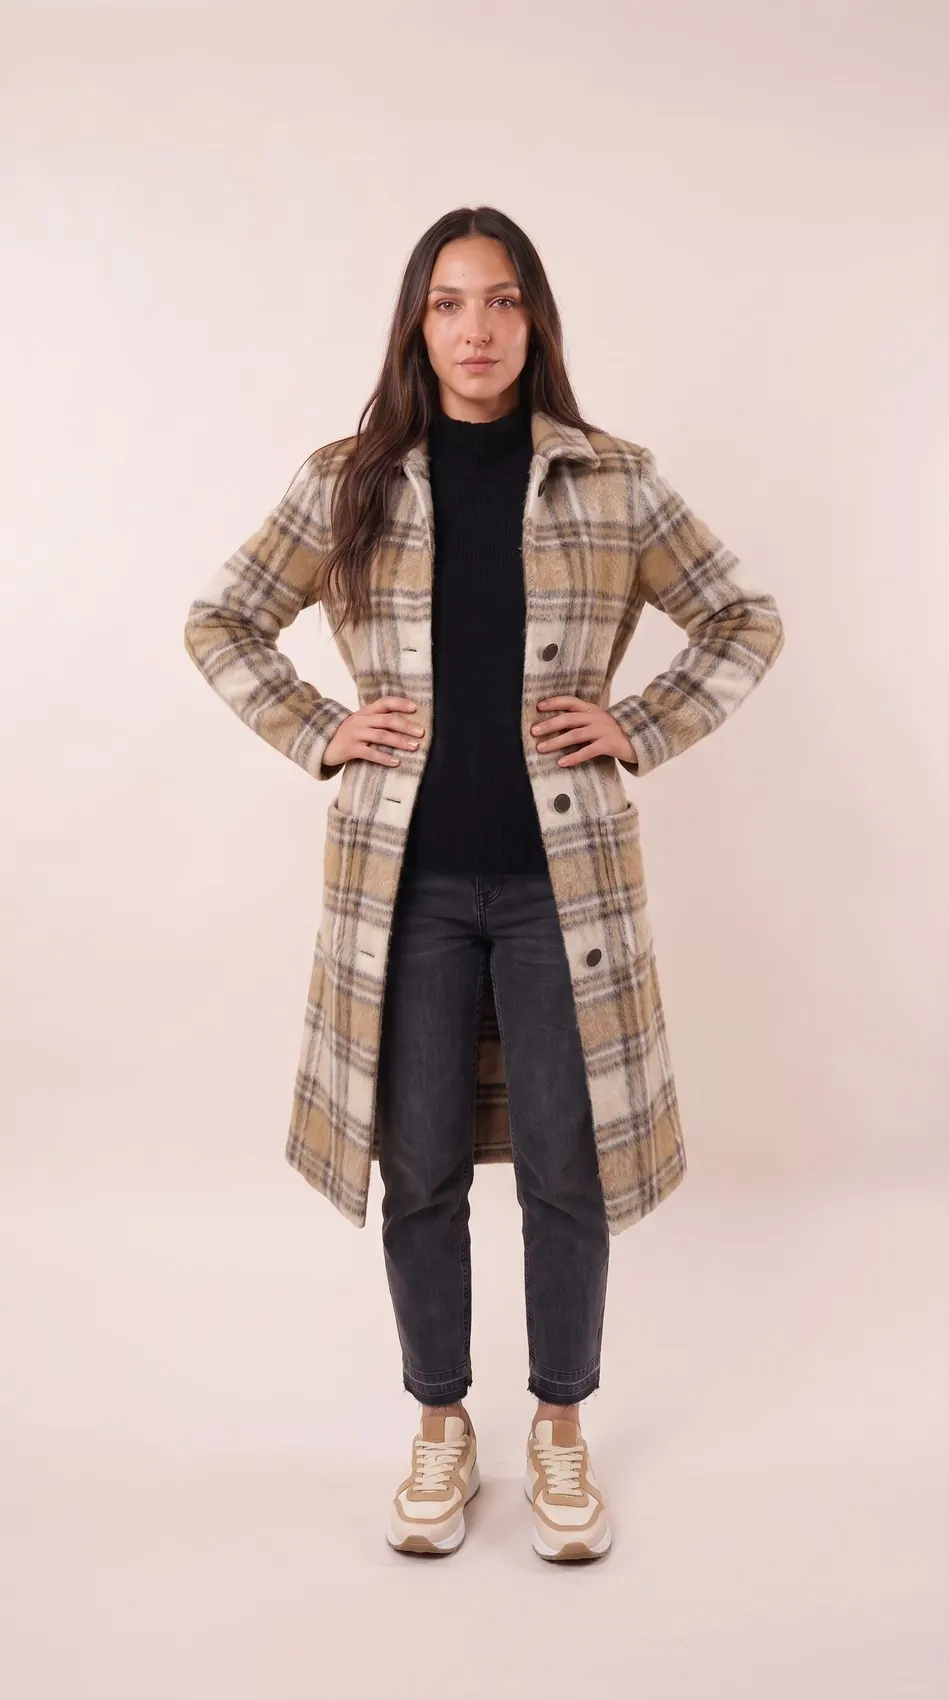
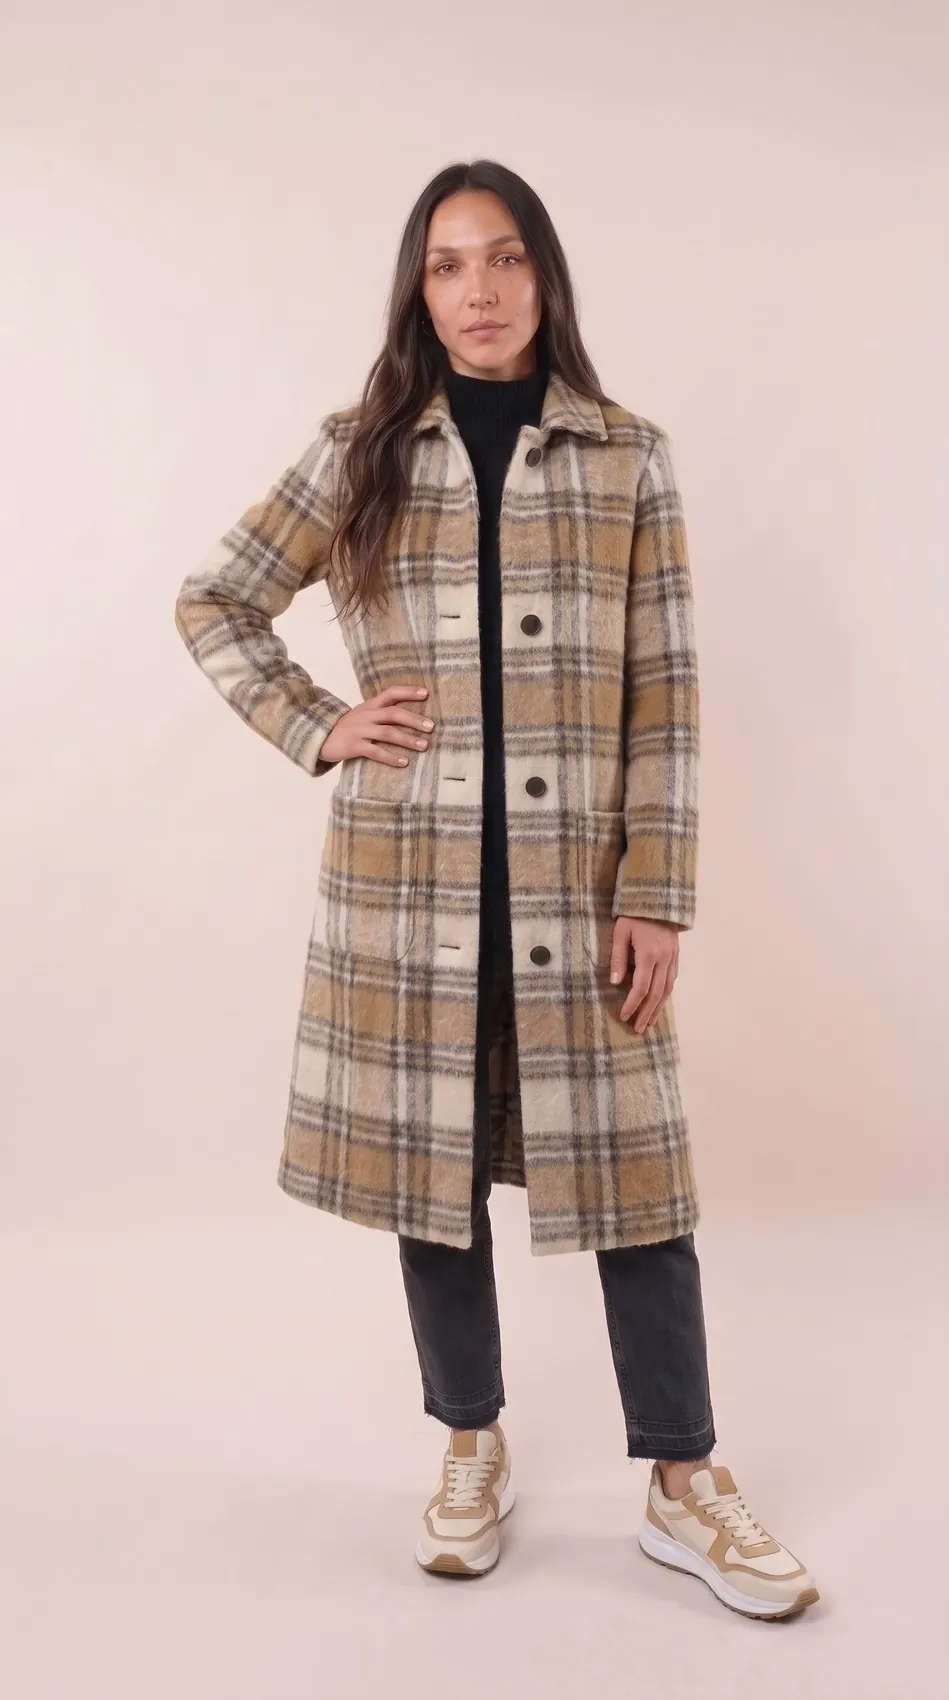
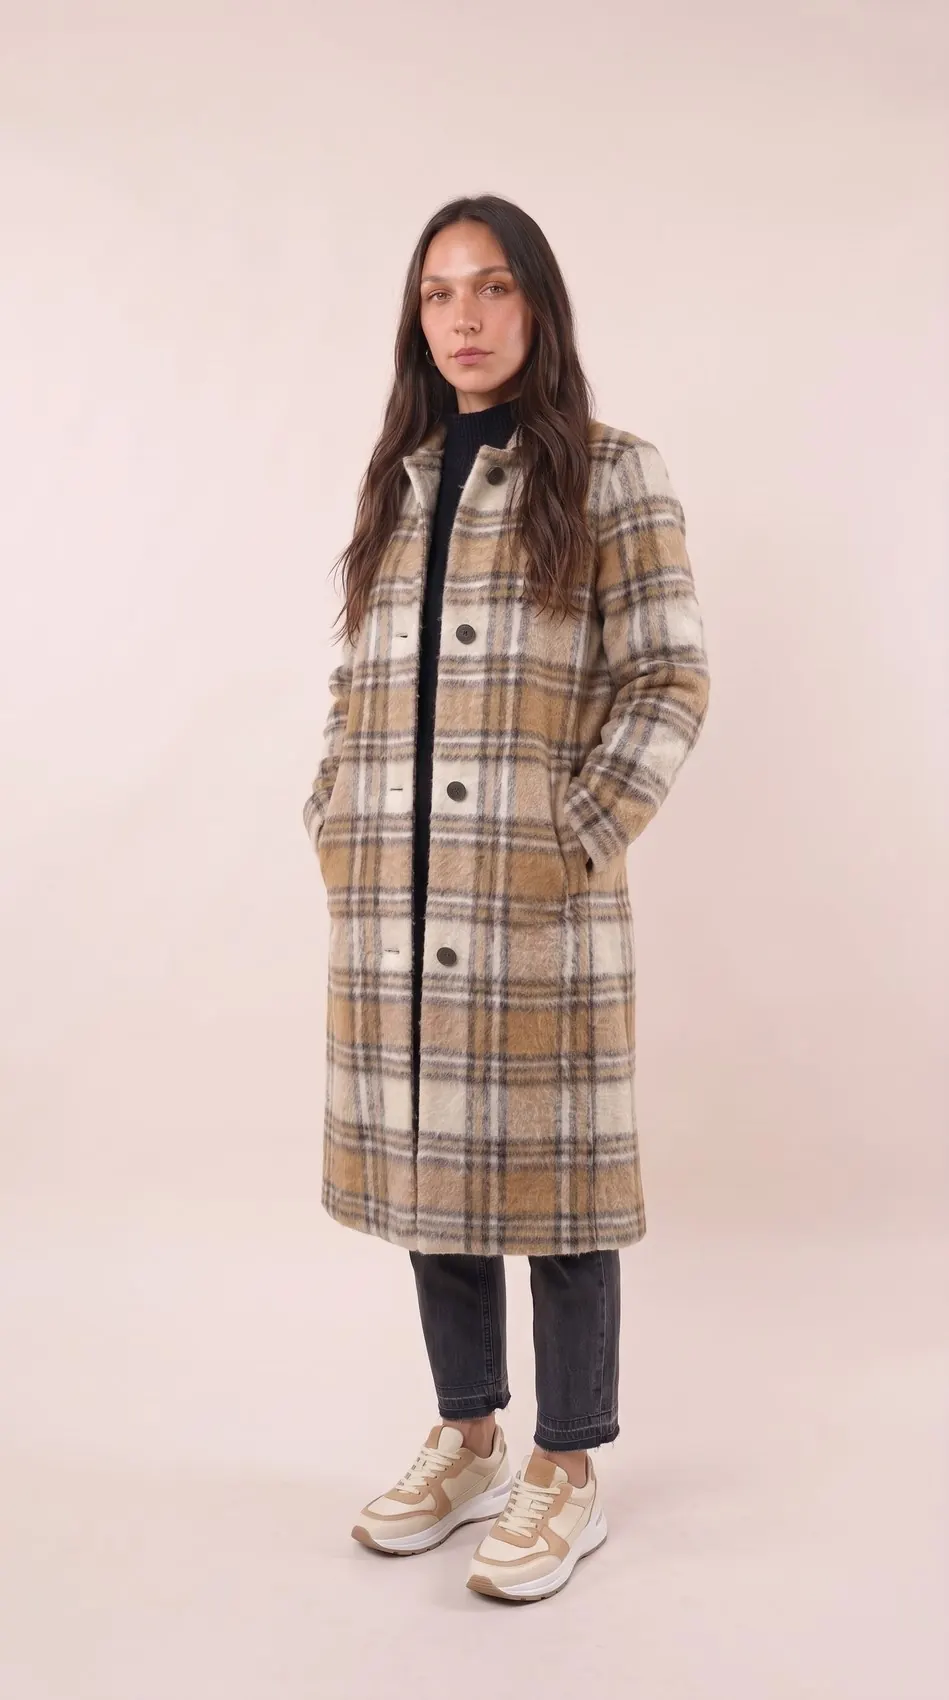
The plaid coat as worn
Over jeans and a black sweater, the plaid coat instantly gives the outfit character.

Plaid coat sizes and length, from 34 to 56
Before you choose your size, check the length of the coat: the tables below give it for every size.
Center back length (in cm)
| Size | 34 | 36 | 38 | 40 | 42 | 44 |
|---|---|---|---|---|---|---|
| Length | 104 | 104.5 | 105 | 105.5 | 106 | 106.5 |
| Size | 46 | 48 | 50 | 52 | 54 | 56 |
|---|---|---|---|---|---|---|
| Length | 108 | 108.5 | 109 | 110.5 | 111 | 111.5 |
Always read all the instructions before cutting the fabric!
Fabric and supplies for a plaid coat
Gather your fabric and supplies before you start. The amounts of bias binding and fabric depend on your size.
Supplies
- Sewing thread
- Buttons (ø 30 mm): 4
- Fusible interfacing: max. 120 cm
- Bias binding: see the table for the length
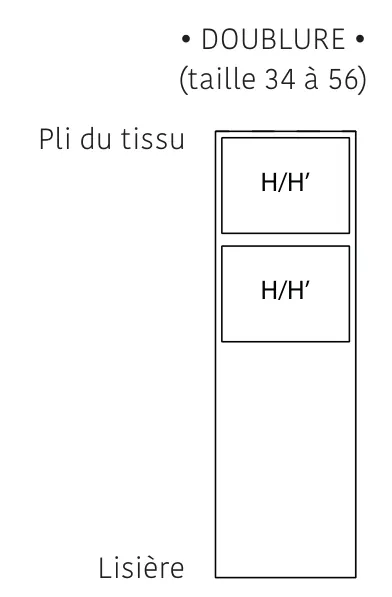
- Lining fabric: 30 cm
- Fabric (140 cm wide): see the table
Bias binding length
| Size | 34-36 | 38-42 | 44-50 | 52-56 |
|---|---|---|---|---|
| Bias binding (in cm) | 235 | 240 | 250 | 260 |
Fabric length
| Size | 34-44 | 46-50 | 52-56 |
|---|---|---|---|
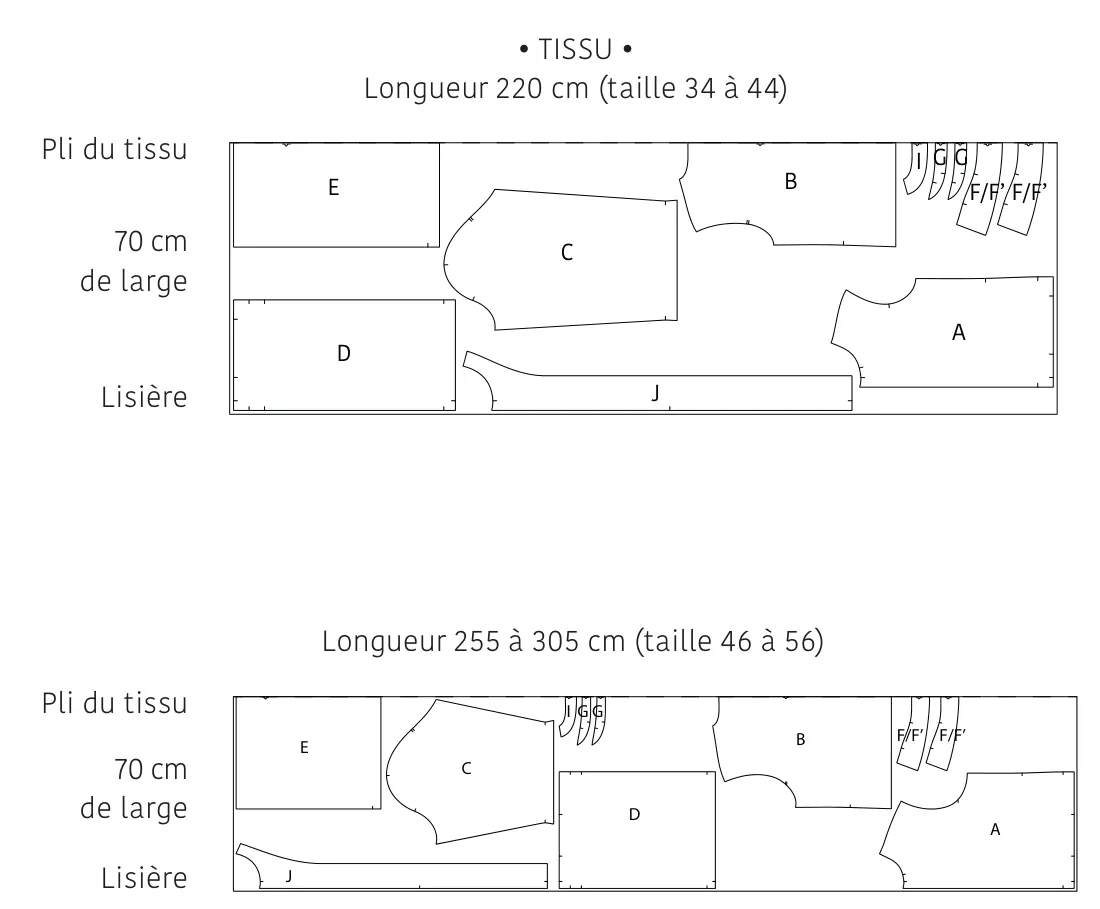
| Fabric length (in cm) | 220 | 255 | 305 |
Which fabric for a plaid coat?
We chose a wool blend with large checks: very soft, thick but light. You can use any kind of coating fabric. Very stretchy fabrics are less suitable.
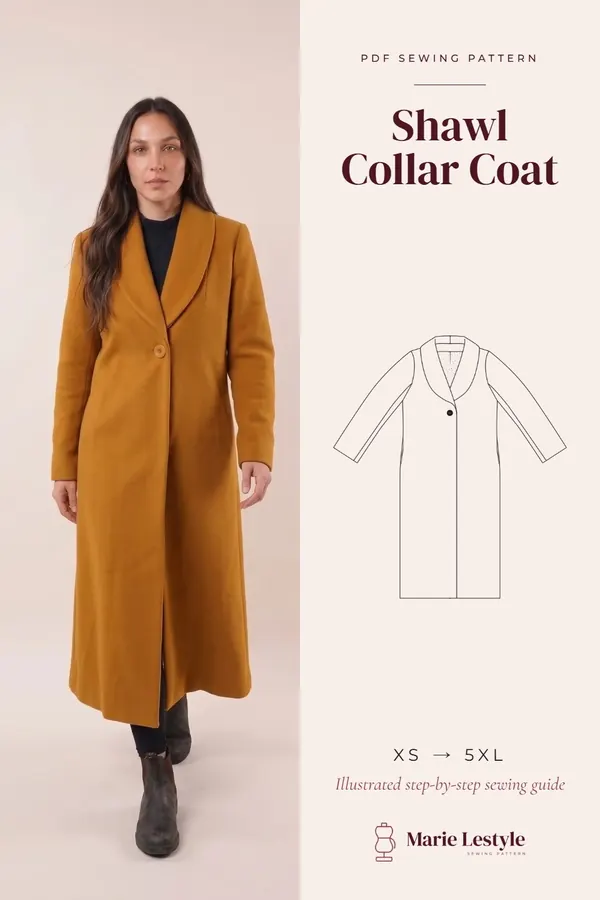
If you'd rather sew a coat in a plain coating fabric, take a look at our shawl collar coat tutorial.
Plaid coat pattern pieces and cutting layout
Cut the pattern pieces from your fabric, in the quantities given below.
| Piece | Name | To cut |
|---|---|---|
| A | Upper front | 2x |
| B | Upper back | 1x on the fold |
| C | Sleeve | 2x |
| D | Lower front | 2x |
| E | Lower back | 1x on the fold |
| F | Upper collar | 1x on the fold |
| F' | Under collar | 1x on the fold |
| G | Collar stand | 2x on the fold |
| H/H' | 4x (from lining) | |
| I | Back facing | 1x on the fold |
| J | Front facing | 2x |
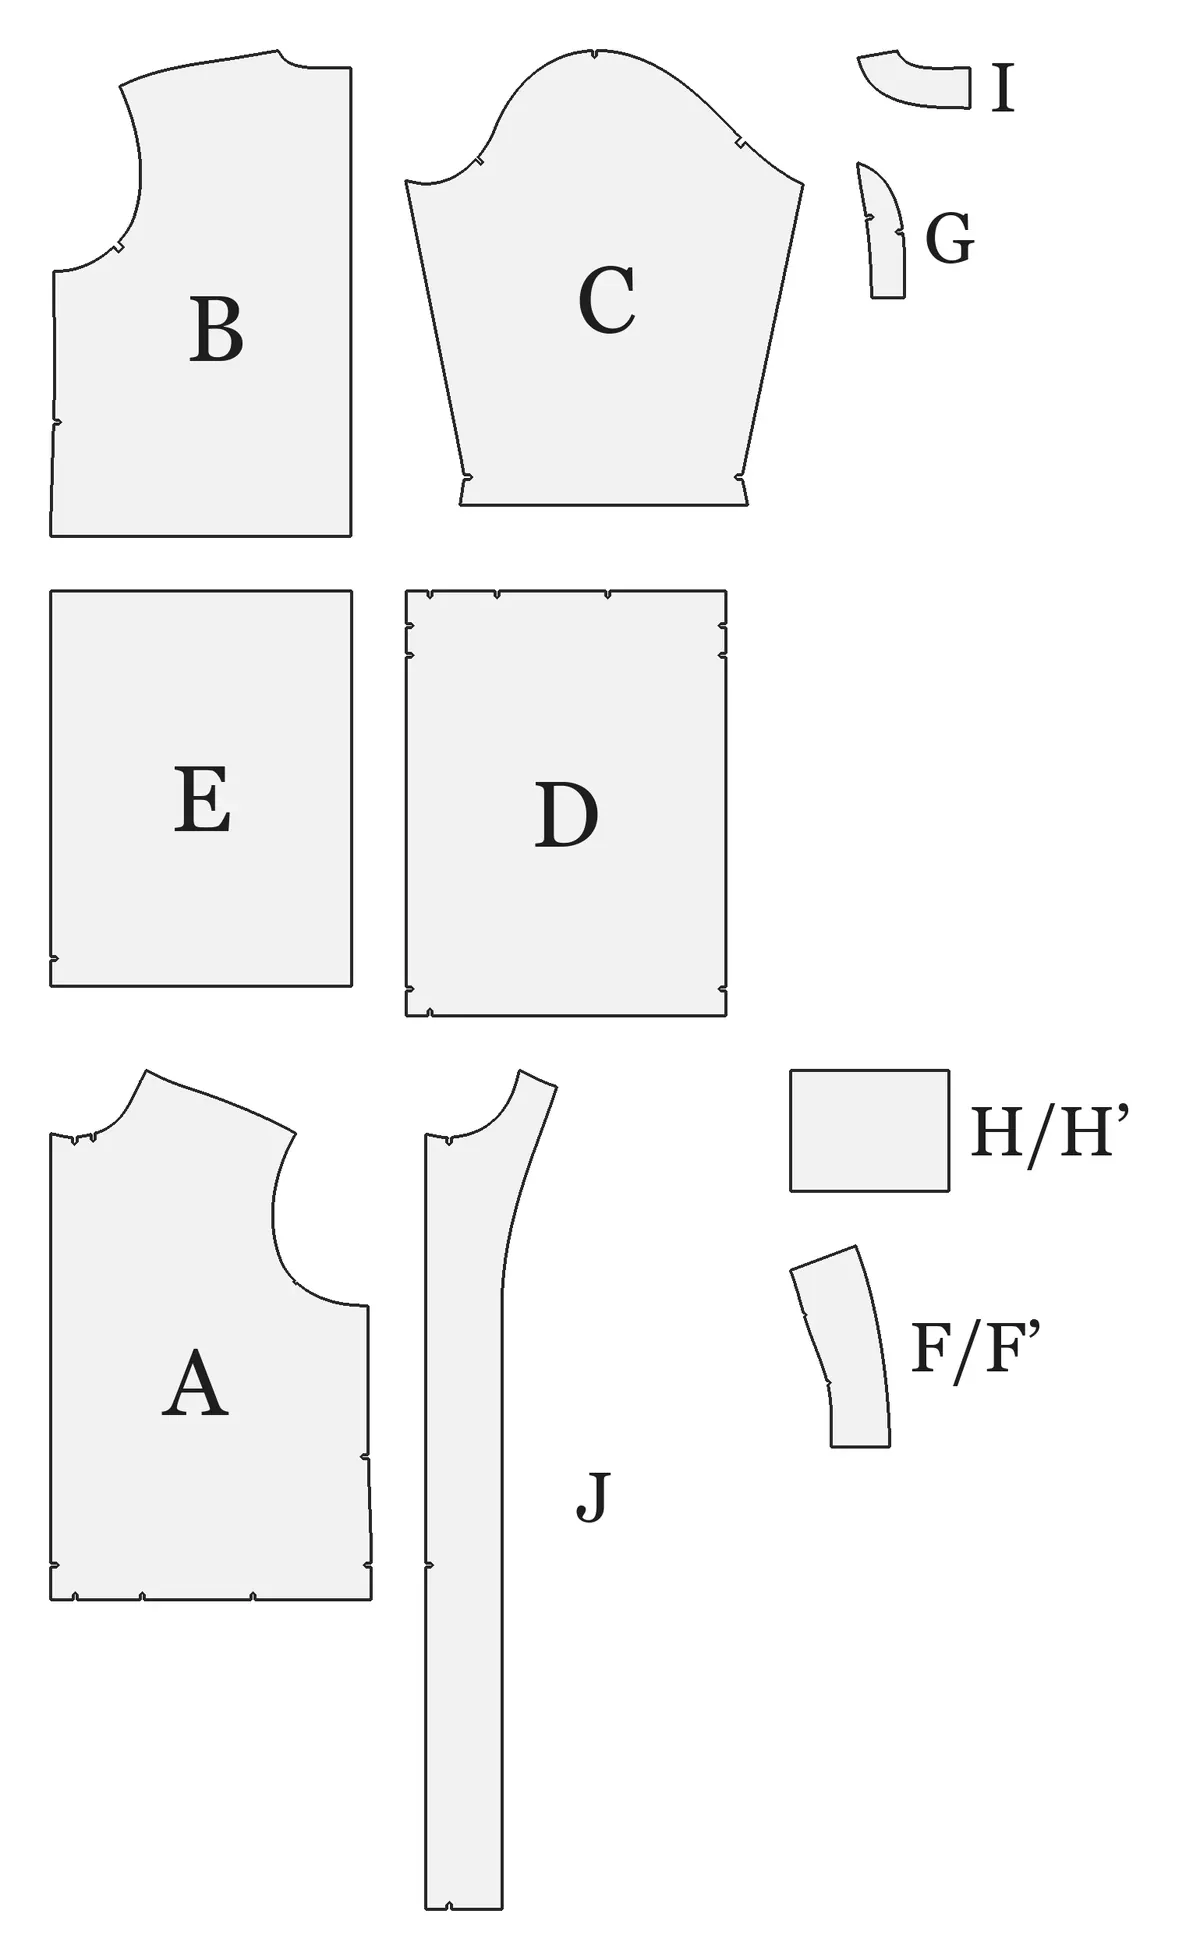
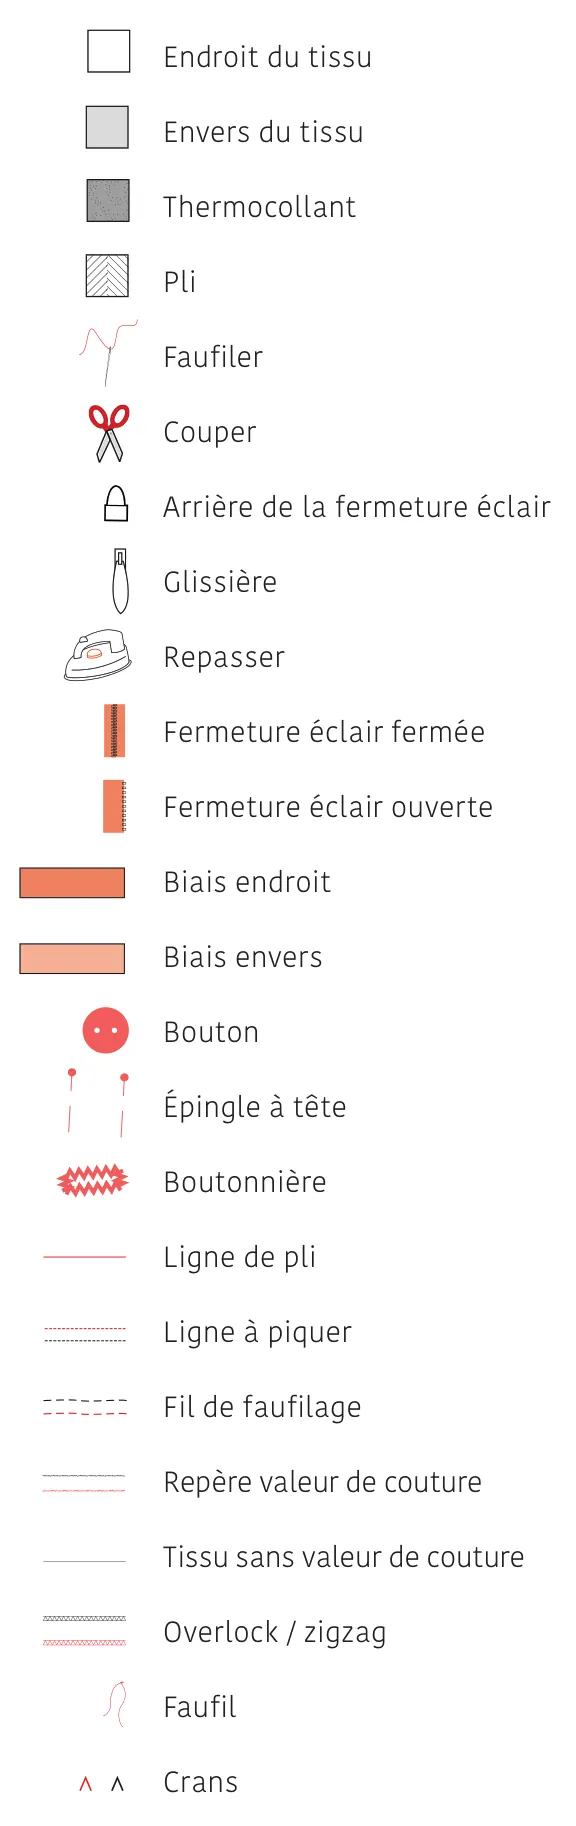
To cut the same piece 2x, cut it through both layers of the fabric folded in half. To cut a single symmetrical piece, place the symbol  on the fold of the fabric.
H and H', and F and F', are the same piece on the pattern.
Seam allowances
These seam allowances are included around the pattern pieces if you selected the “Cutline” layers in the PDF pattern.
| Pieces | Seam allowances |
|---|---|
| A, C, D, H, H', J | all around: 1 cm |
| B, E, F, G, I | CB: 0 cm (on the fold) — all around: 1 cm |
Remember to transfer all the markings shown on the pattern to the fabric, using notches and tailor's tacks.
Interfacing
Apply fusible interfacing to the wrong side of the following pieces.
| Pieces | To interface |
|---|---|
| F', I | the whole piece |
| G, J | each piece in full |
Cutting layout
The layout below is for fabric 140 cm wide.
The PDF pattern to print
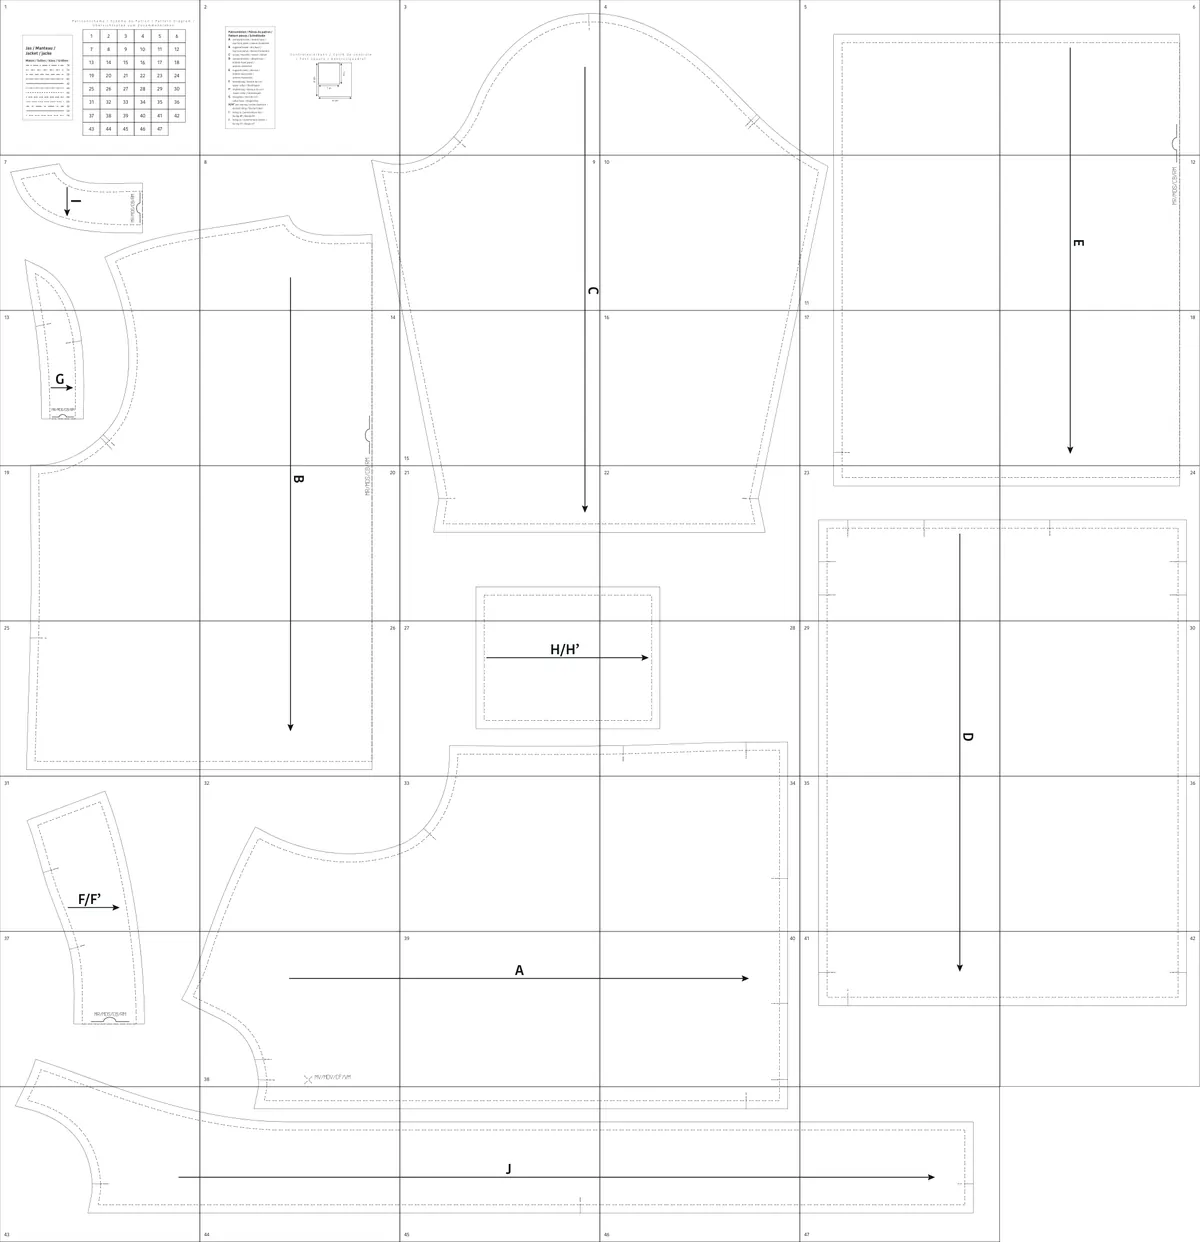 A · Upper frontB · Upper backC · SleeveD · Lower frontE · Lower backF/F' · CollarG · Collar standH/H' · PocketI · Back facingJ · Front facing
The pieces of the plaid coat come in the PDF pattern: you print it at home at actual size, then tape the sheets together. It covers sizes 34 to 56, and you can print just your own size. The sewing tutorial itself stays free on this page.
Download the PDF patternHow to sew a coat step by step: the plaid coat
The assembly starts with the front and its pockets and ends with the buttons and a final press. Each step shows a diagram next to its instructions.
Seam allowances are included in the pattern if you printed the “Cutline” lines: 1 cm all around, 0 cm at the CB of B, E, F, G and I (on the fold).
Step 1 — Front
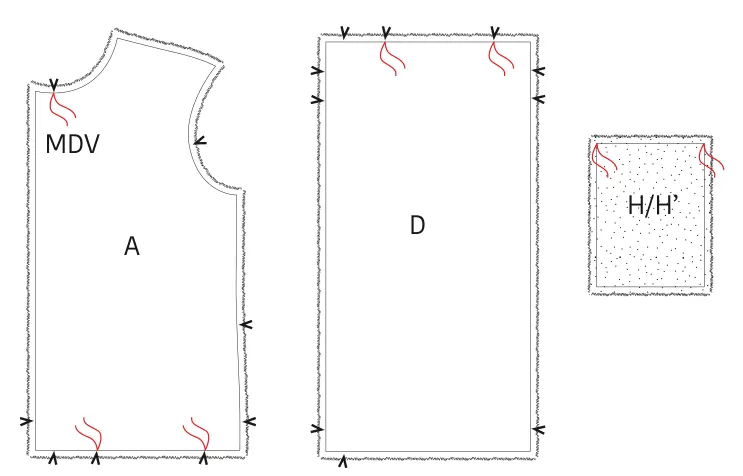
- Mark the points shown on A, D and H/H' with tailor's tacks.
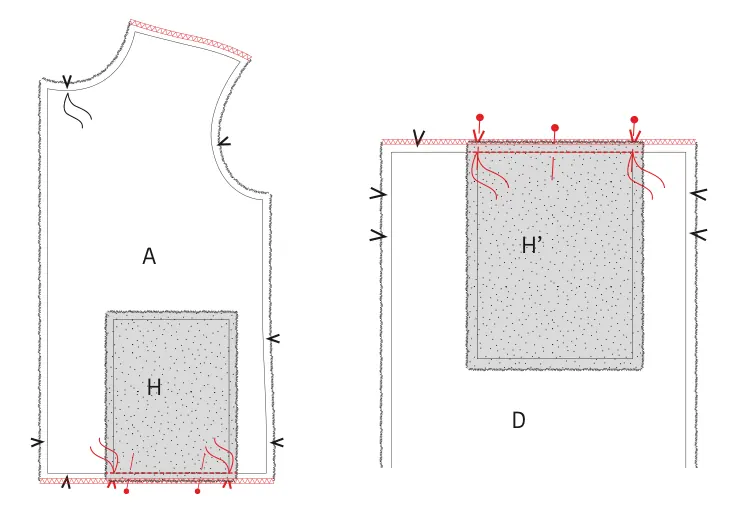
- Pin the markings of the pocket (H) to the markings of the upper front (A).
- Stitch.
- Pin the markings of the second pocket piece (H') to the markings of the lower front (D).
- Stitch.
- Zigzag or overlock the shoulder seams and the lower seam of A.
- Also zigzag or overlock the upper seam of D.
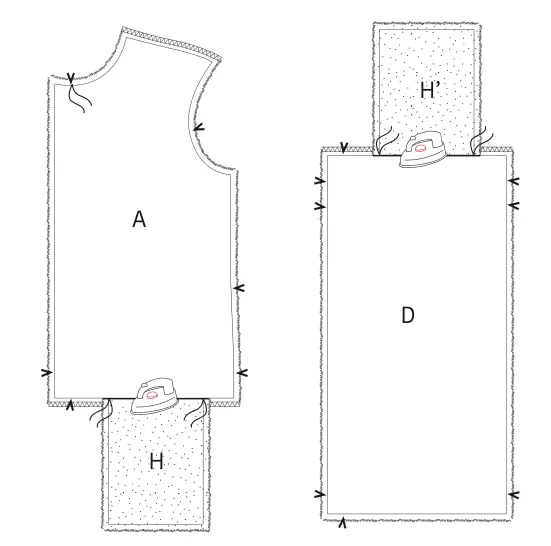
- Press the pocket attached to A downward, the pocket attached to D upward, and the seam allowance as well.
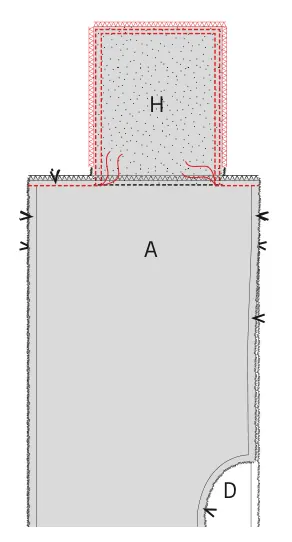
- Pin H to H'.
- Also pin the seams of A to D as shown in the drawing.
- Stitch.
- Stitch around the edge of pocket H a second time, 0.5 cm from the previous stitching.
- Zigzag or overlock the pocket (as far as possible).
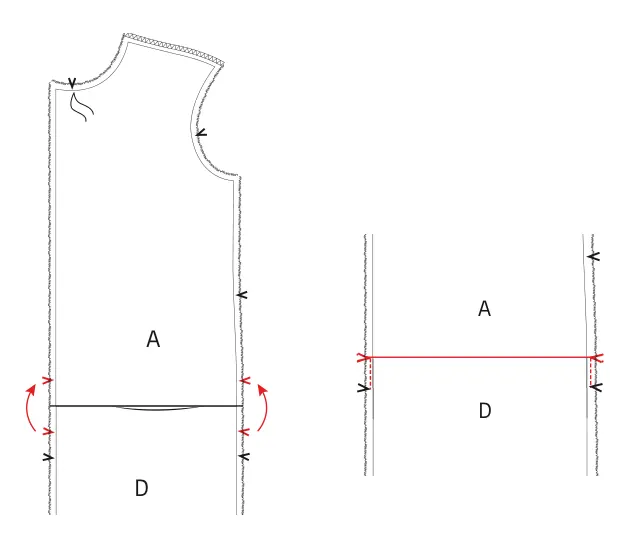
- Fold A upward and H downward, toward piece D.
- Fold the upper edge of D in half at the upper marking and pin it to A in the side seam and the CF seam.
- Machine-baste in the seam allowance, at 0.5 cm.
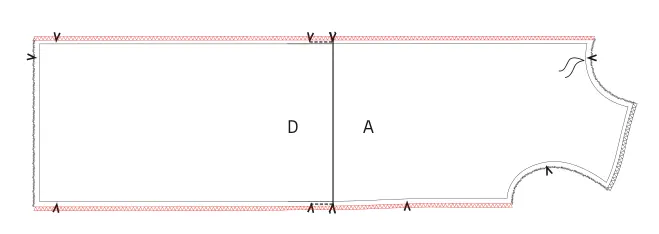
- Zigzag or overlock the CF seam and the side seam.
- Repeat all the previous steps for the other A/D/H/H' pieces.
Step 2 — Back
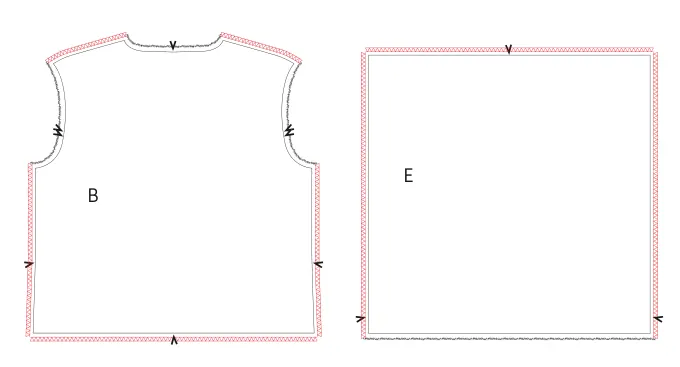
- Zigzag or overlock all the edges shown on the upper back (B) and the lower back (E).
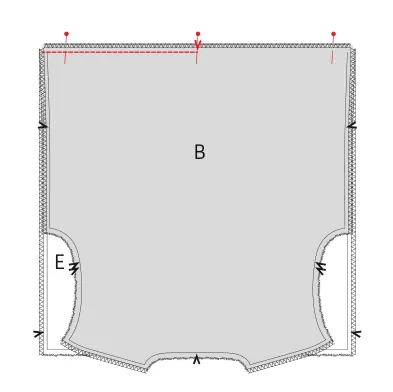
- Pin and stitch the lower edge of B to the upper edge of E, right sides together.
- Press the seam open.
Step 3 — Side and shoulder seams
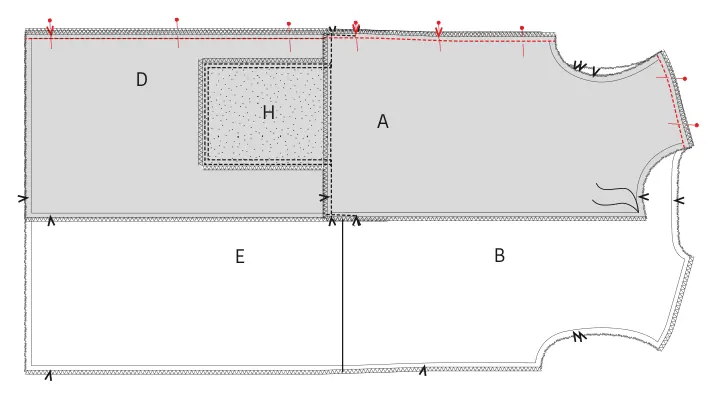
- Pin the side seams of A and B, and of D and E, right sides together, and stitch.
- Press the seam open.
Step 4 — Sleeve
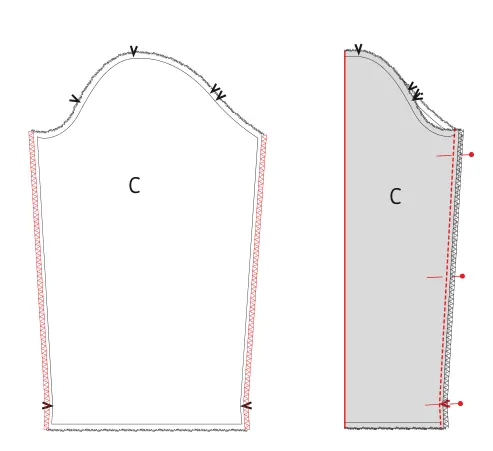
- Overlock or zigzag the sides of the sleeve (C).
- Fold C in half, right sides together, and stitch the sides.
- Press the seam open.
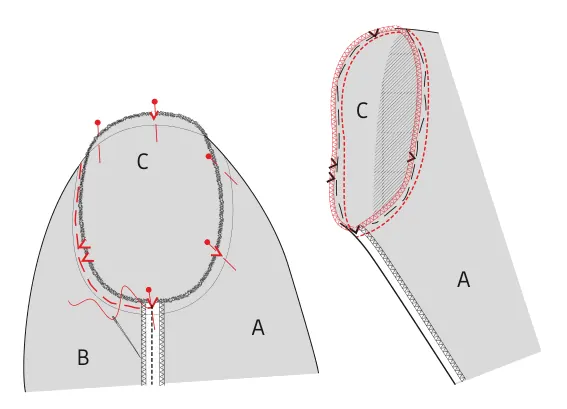
- Pin the upper edge of C to the armhole of the garment, right sides together, matching the markings.
- Baste the sleeve first to avoid unwanted puckers.
- Then stitch.
- Zigzag or overlock the seam.
Step 5 — Collar
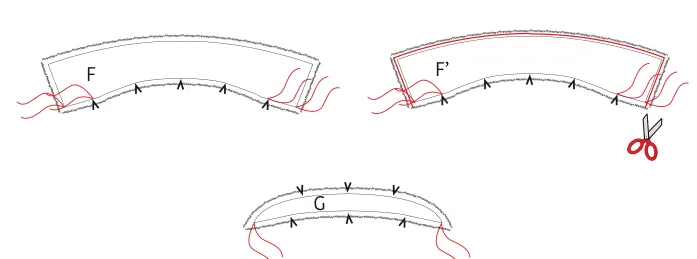
- Cut 2 mm off the outer edge and the short sides of the interfaced under collar piece (F').
- Mark the corners shown on both collar pieces (F and F') and both collar stands (G) with tailor's tacks.
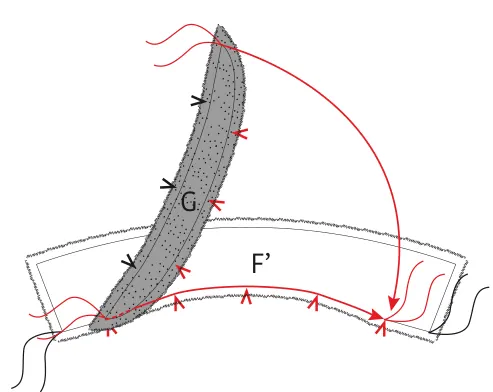
- Pin the upper edge of 1 G piece to the lower edge of F', right sides together (the curved side of the collar), matching tailor's tacks and markings.
- Stitch.
- Press the seam allowance open.
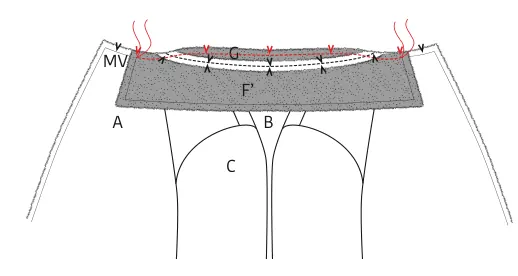
- Pin the lower edge of the collar (F' + G) to the neckline of the garment, right sides together, matching the markings.
- The tailor's tack on the outer edge of G must match the outer marking.
- Stitch (up to the tailor's tacks).
Step 6 — Facing
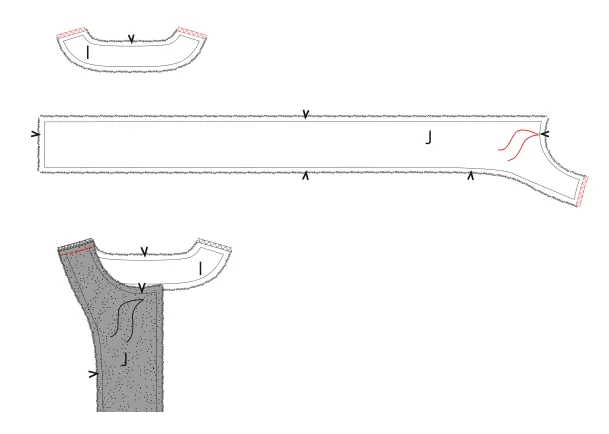
- Zigzag or overlock the shoulder seams of the front facing (J) and the back facing (I).
- Pin the shoulder seams of I and J right sides together and stitch.
- Press the seams open.
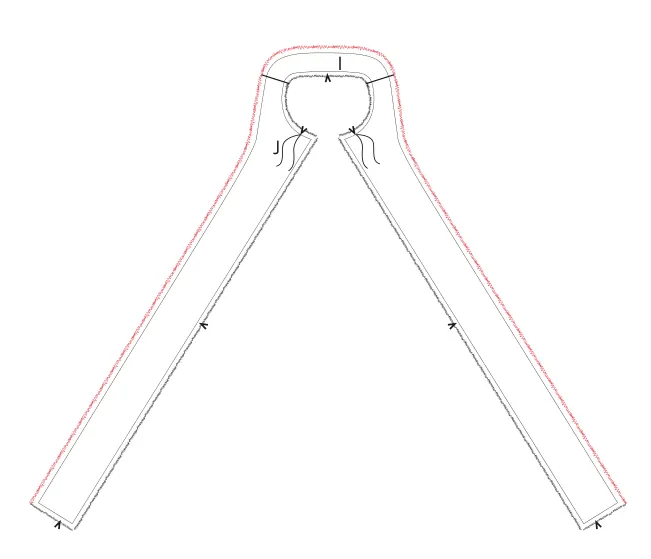
- Finish the outer edge of the facing with bias binding.
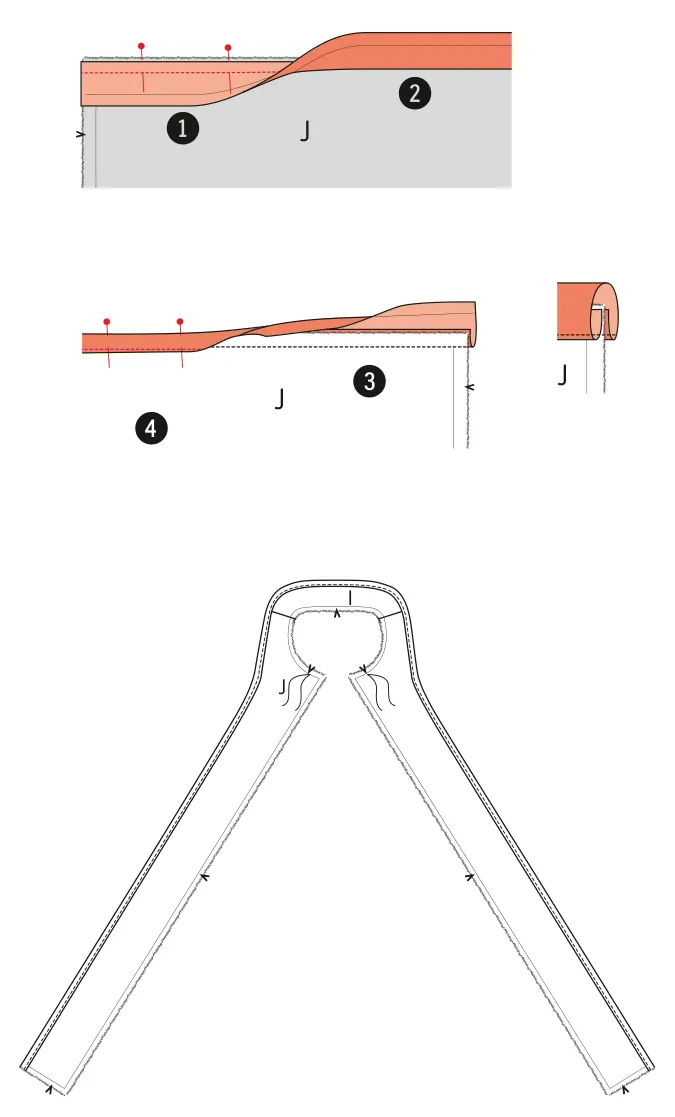
- Unfold the bias binding and pin 1 side of it to the outer edge of the facing, right sides together.
- Stitch along the first fold line.
- Trim the seam allowance and fold the bias binding over the seam allowance, wrapping it to the other side.
- The folded edge of the bias binding falls just over the previous stitching.
- Stitch close to the edge.
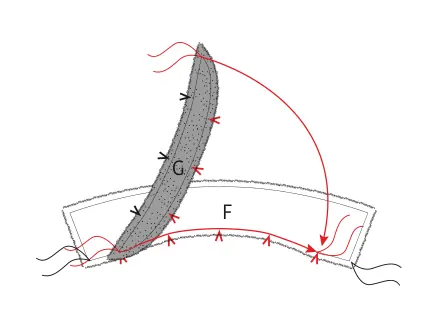
- Pin the curved edge of the other G piece to the lower edge of the non-interfaced collar piece (F), right sides together; the tailor's tacks and markings must match.
- Stitch.
- Press the seam allowance open.
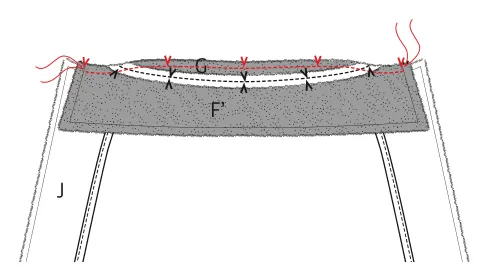
- Then pin the lower edge of this collar (F + G) to the neckline of the garment, right sides together, matching the markings.
- The tailor's tack on the outer edge of G must match the first marking.
Step 7 — Finishing the neckline and facing
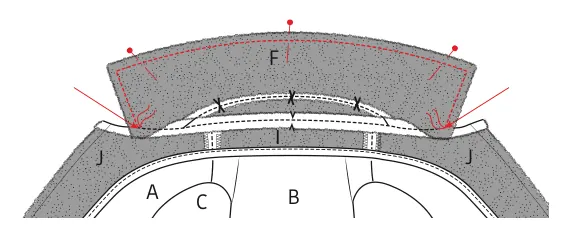
- Place the facing on the garment, right sides together.
- Line up and pin the edges of F/F' all around and stitch up to the tailor's tacks.
- Take care not to catch the seam allowances of I and A.
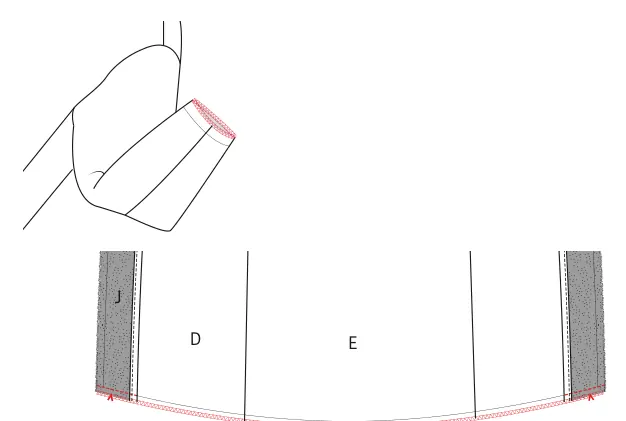
- Pin and stitch the lower edge of J to the hem of D, with the front corners matching, right sides together.
- Zigzag or overlock the seam.
- Also zigzag or overlock the sleeve hems.
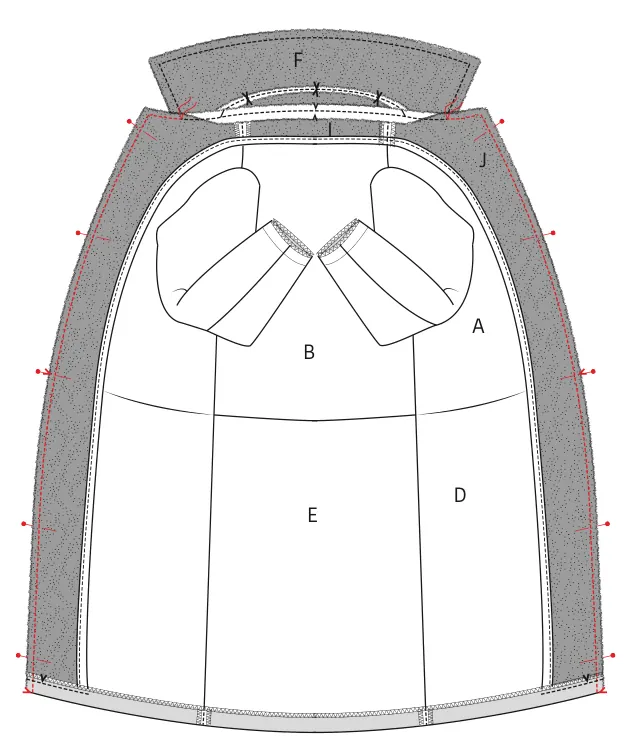
- Then pin the edges of J and A all around, on both sides of the garment.
- At the bottom, the hem allowance folds automatically along the pressed fold line, right sides together.
- Start stitching at the tailor's tack at the neckline and stitch down to the hemmed edge.
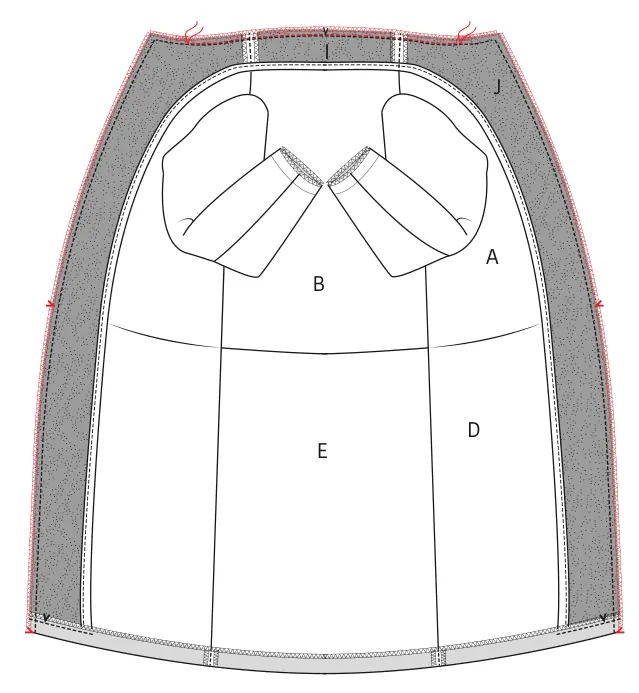
- Turn the collar to the wrong side and attach the facing necklines to the garment neckline by stitching through the seam allowances, right on the previous stitching.
- Then zigzag or overlock this seam.
Step 8 — Hems
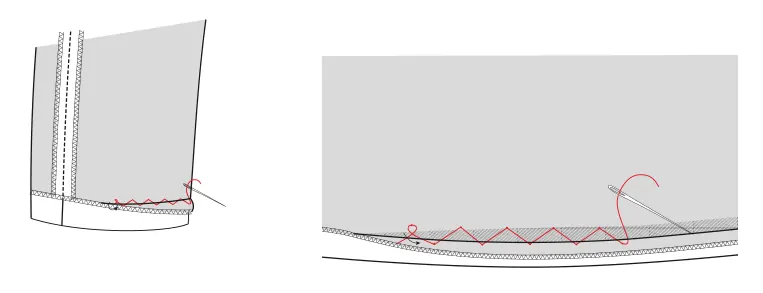
- Sew the hem allowance of the sleeves and the garment with an invisible catch stitch.
- Also sew the outer and inner edges of the D pockets on the inside with an invisible catch stitch.
Step 9 — Buttons
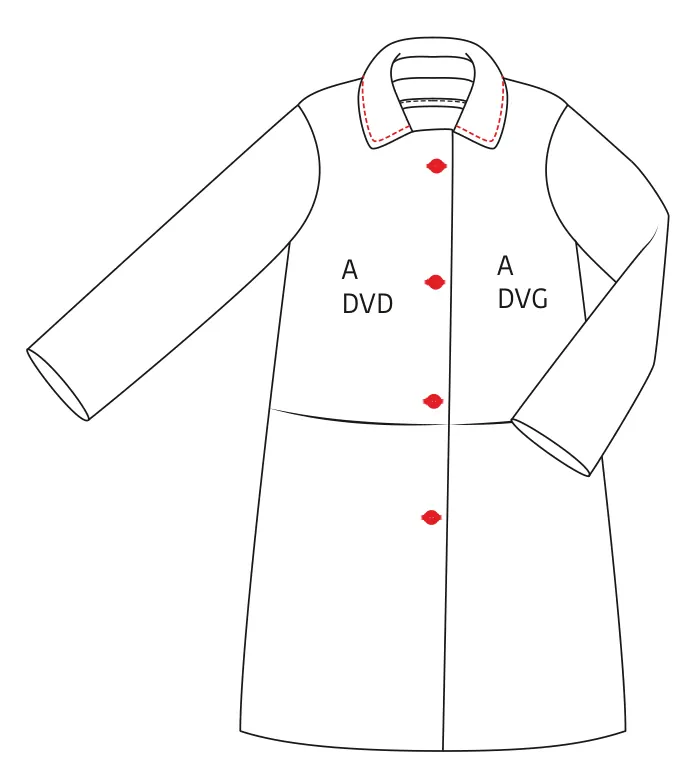
- Make horizontal buttonholes in the RF (A).
- The position of the first button is marked on the pattern.
- Make the other buttonholes at equal intervals.
- Then sew the buttons onto the LF piece.
- Sew a decorative line of stitching on the collar, 0.5 cm from the edge.
Step 10 — Final pressing
- Press the garment and you're done!
Practical tips for sewing a plaid coat
These common sewing techniques complement the instructions. They change neither the order of the steps nor the measurements given in this tutorial.
Before you start
- Test-stitch on a scrap of the same fabric, in a double layer, to set the stitch length and tension.
- For a thick coating fabric, use a heavier machine needle than for a lightweight fabric, and change it if it snags.
- Fusible interfacing: place the adhesive side (rough, shiny) against the wrong side of the fabric. Cover with a pressing cloth and press the iron down without sliding it, section by section. Test first on a wool scrap.
- Transfer all the markings before removing the paper: notches around the edges, tailor's tacks for the inner points (pockets, corners of the collar and collar stand, first button).
Matching plaid fabric
- If your fabric has large checks, like ours, place the pieces so that the checks line up at the side seams, at the center front and at the seam between the upper and lower parts of the coat. Depending on the size of the checks, you may need a little more fabric than the length given.
- To place the checks more easily, you can cut the pieces in a single layer: flip the paper pattern over to cut the second of each piece cut 2x, and trace the pieces cut on the fold in full, mirrored.
Pockets (step 1)
- The second line of stitching 0.5 cm around the pocket reinforces it: the pocket takes a lot of strain when you put your hands in.
- Fold the upper edge of D carefully at the upper marking: this folded edge forms the pocket opening. The temporary stitching is done only in the seam allowance, at 0.5 cm.
Collar and collar stand (steps 5 to 7)
- The 2 mm trimmed from the under collar (F') makes it slightly smaller than the upper collar: the seam rolls toward the underside and stays hidden.
- Stitch exactly up to the tailor's tacks, without going past them: the corners of the collar and collar stand stay crisp.
- In thick wool, carefully trim the seam allowances and cut the corners diagonally before turning the collar.
Buttonholes (step 9)
- First make a test buttonhole on a wool scrap of the same thickness as the front.
- Open the buttonhole with a seam ripper, with a pin across the end so you don't cut through the bar tack.
Muslin (test garment)
- Cut pieces A, B, C, D and E from an inexpensive fabric with a body similar to the real fabric, and sew them together with a long stitch, without finishing.
- Check the across-back width and armholes, the sleeve length, the center back length (chapter 02, “Plaid coat sizes and length, from 34 to 56”), the height of the pockets for your hands, and that you can move your arms freely.
- Transfer any changes to the paper pattern before cutting the real fabric.
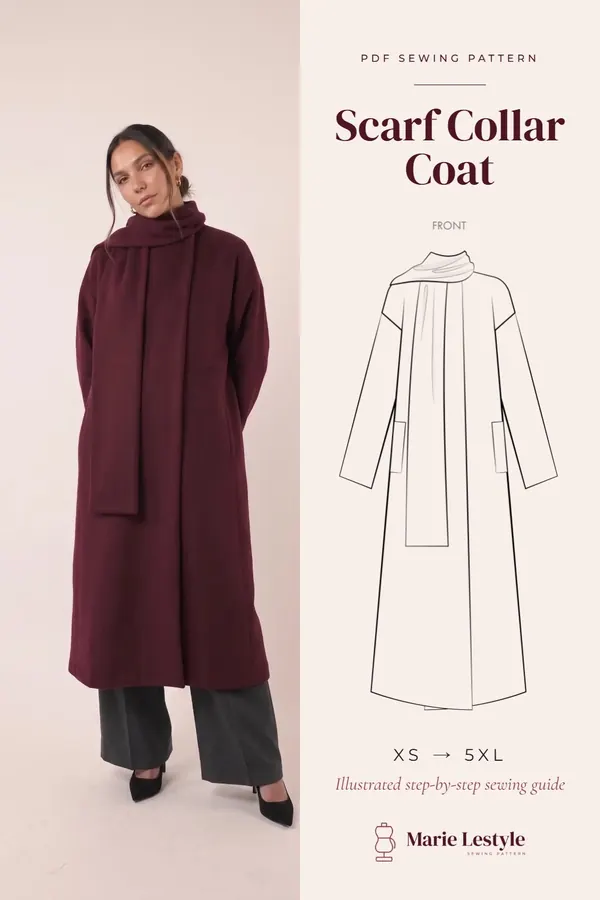
Looking for another coat to sew this season? See our scarf collar coat tutorial.
Sewing glossary
Here are the definitions of the sewing terms used in this tutorial, to keep at hand while you sew.
| Term | Definition |
|---|---|
| Backtack | Secure a seam at its start and end by sewing three stitches backward, then one forward. |
| Bagging | Stitch around the edges of two pieces of fabric (or one piece folded double), right sides together, and turn right side out. |
| Baste | Join several layers of fabric with a hand needle and basting thread using long stitches, or thread-trace certain pattern lines onto the fabric. |
| Center back | The line marking the middle of the back of the body. |
| Center front | The line marking the middle of the front of the body. |
| Darts | By folding and partly stitching the fabric in certain places, you give your garment more shape. These folds are called darts. |
| Ease | Extra room built into the pattern beyond the exact body measurements to allow enough freedom of movement and comfort. |
| Facing | The pattern piece used to finish edges such as necklines, armholes, zippers or the center front. |
| Fold | The fold of the fabric obtained by folding it double. |
| Fusible edge tape | Fusible tape 1 cm wide, cut on the bias and reinforced with a chain stitch. It is used to stabilize curves (necklines and armholes) so they do not lose their shape. |
| Fusible interfacing | Also called iron-on interfacing. A fine fabric ironed onto the wrong side of certain parts of a garment to stabilize them, for example a waistband, a facing or a collar. |
| Markings | Some markings are made with notches, small snips cut into the edge of the fabric to show the position of important features (pleats, armholes…). Important points inside the pattern, such as the ends of a dart or the position of a button, buttonhole, pocket or flap, are marked with a tailor's tack. |
| Overlock | Trim fraying edges with an overlocker (serger) and finish them with an overlock stitch. |
| Press | Lower the iron onto a damp pressing cloth, for example to flatten seams or get crisp folds. When pressing, you barely move the iron. |
| Presser foot | The part of your sewing machine under which the layers of fabric are placed and fed through. |
| Presser-foot width | Sewing at presser-foot width means running the edge of the presser foot along the seam or edge being stitched. |
| Seam allowance | The extra fabric needed to join two pieces. The amount depends on the finishing method used. |
| Selvage | The edge of the fabric running along the lengthwise grain. |
| Stay tape | A strip of fusible tape 1, 1.5 or 2 cm wide used on the wrong side to stabilize straight seams (such as shoulder seams) so the fabric does not stretch. |
| Straight-grain tape / bias binding | A narrow strip of fabric or tape stitched onto the edge to be finished. As the name suggests, straight-grain tape is cut on the straight grain and bias binding on the bias. |
| Trim | Cut away part of the seam allowance to avoid excess bulk in one place. In corners, the seam allowance is trimmed diagonally so it turns out neatly. |
Abbreviations used
| Abbreviation | Meaning |
|---|---|
| Ft | front |
| Bk | back |
| RF | right front |
| LF | left front |
| RB | right back |
| LB | left back |
| CF | center front |
| CB | center back |
| SS | side seam |
| YK | yoke |
| WB | waistband |
| ShS | shoulder seam |
| L | left |
| R | right |
In the PDF pattern, the sheets to print are pages 29 to 75. Print them at actual size, in landscape. You'll find the plaid coat PDF pattern in the shop, and if you prefer a shorter garment, our short zip jacket tutorial.
PDF · 34 – 56
The PDF pattern for this design : Plaid Coat
Every piece to print at home at full size, with this guide as a PDF.
Download the PDF patternPDF pattern sold in the Marie Lestyle shop.
Frequently asked questions : Plaid Coat
What sizes does the plaid coat come in?
The plaid coat is drafted in sizes 34 to 56. The center back length goes from 104 cm in size 34 to 111.5 cm in size 56; the full table is in the section “Plaid coat sizes and length, from 34 to 56”.
How much fabric do I need to sew the plaid coat?
With fabric 140 cm wide, you need 220 cm for sizes 34 to 44, 255 cm for sizes 46 to 50 and 305 cm for sizes 52 to 56. If your fabric has large checks, you may need a little more to line them up.
What fabric is best for a plaid coat?
Any kind of coating fabric works. Our coat is sewn in a wool blend with large checks, very soft, thick but light. Very stretchy fabrics are less suitable.
What supplies do I need besides the fabric?
Sewing thread, 4 buttons (ø 30 mm), up to 120 cm of fusible interfacing, 30 cm of lining fabric for the pockets, and bias binding: 235 cm for sizes 34-36, 240 cm for 38-42, 250 cm for 44-50 and 260 cm for 52-56.
Are seam allowances included?
Yes, if you print the “Cutline” lines of the PDF pattern: 1 cm all around, and 0 cm at the center back of pieces B, E, F, G and I, which are cut on the fold.
Is the plaid coat lined?
No, the coat is unlined. Only the pockets are cut from lining, and the outer edge of the facing is finished with bias binding.